Tuesday, July 19, 2011

Surali Chi Wadi or Khandvi


I recently tried my hand at making khandvi (gujarati) or surali chi wadi (marathi). For some reason, I always assumed that this was a very difficult dish to make. Thanks to Nupur of One Hot Stove for inspiring me to make it. I used her recipe here. My verdict is that it is easy to make, quick and tasty as a snack or appetizer. One item that I would love to try making is patra but I am not even sure where I would get the ingredients. So I stick to the frozen version which is good enough :) Dhokla, khandvi and papdi were staple munchies at my place whenever we could go to the gujju sweet shops in King Kothi and get them. Thanks to my parents for my exposure to gujju food. As I made friends with other gujjus, I learnt more about other delicacies like undhiyu, khichdi, kadhi. A lot of the dishes are close to marathi food yet different in many ways. Its a cuisine I love to explore especially due to the wide variety of vegetarian options. So more to come here as I try more gujju recipe.

Monday, July 18, 2011

Vegetable Hakka Noodles And Chilli Paneer

Every now and then, I have this craving for Indo-Chinese and sadly there are just one or two places in the bay area where I can get something very close to what you get in India. So at times, I slog it out in the kitchen to recreate some of my favorite dishes. The first ever taste of noodles I had was from a Restaurant in Hyderabad near my home called Reddy's and they used to pack these awesome hakka moodles with a salan-like gravy. I know you are probably thinking gravy with noodles??? But trust me, this was the tastiest accompaniment to the noodles and it tasted even better when reheated the next day. Sadly that place closed down and I have never found an equivalent of it since then. I didn't fathom it back then but that was my first taste of fusion food :) . Another tasty haunt for indo chinese is the road side stalls where they cook up the food with fire rising from the wok. The downside to these places is that you never really know what you are eating and the upside is that whatever is on your plate will please your taste buds. My initiative of cooking Indo-Chinese food started with my desire to get my mom to taste some of it since she is a hard core vegetarian and very apprehensive about trying chinese food. So I started with fried rice and vegetable manchurian and was delighted when she ate it and loved it. The recipe I have in this post for Chilli Paneer was an outcome of a weekend I spent at my friend Renuka's place in Chicago. She introduced me to mushroom soy sauce which is a thick and rich variety of soy sauce and adds wonderful flavor to all chinese food. It is high in sodium but then you cannot afford to pay much attention to the sodium and oil content of Indo-Chinese food if you don't want it bland. I have used this sauce for making alu 65 with tater tots as my friend did and it is a very easy and tasty dish to make for a pot luck. The chilli paneer version with this sauce is easy as well and a perfect accompaniment to any fried rice or noodle dish that you whip up. I could go on and on about Indo-Chinese food but I should probably stop here so that I have more to write next time:)

Vegetable Hakka Noodles Recipe:

Ingredients:
  1. Hakka Egg Noodles - 1 packet, boiled and strained (I get this pack in the India store)
  2. Ginger - 2 inch piece chopped finely
  3. Garlic - 10 cloves, finely chopped
  4. Carrot - 1 cup, cut into thin long strips
  5. Beans - 1 cup cut diagonally and thin
  6. Cabbage - 1 cup, chopped long
  7. Spring onion - 1 cup
  8. Salt
  9. Black pepper powder - 1/2 tsp
  10. Vinegar - 1/t tsp
  11. Mushroom soy sauce - 1 tsp
  12. MSG or ajinomoto - 1/4 tsp
  13. Red chilli flakes - 1/4 tsp
  14. Oil - 1 tbsp
Directions:
  1. Heat oil in a wok and when it gets very hot, add the ginger and garlic.
  2. Once the ginger and garlic are fried, add the sprint onions and cabbage.
  3. Saute on high heet for a min and then add the carrot and beans.
  4. Once the veggies are cooked slightly (don't let them overcook), add the noodles, salt, pepper, chilli flakes, msg, vinegar, soy sauce and mix well.
  5. Let the noodles cook on high heat for a couple of mins and they are done.

Chilli Paneer Recipe:

Ingredients:
  1. Oil - 1 tsp
  2. Ginger - 2 inch piece, finely chopped
  3. Garlic - 10 cloves, finely chopped
  4. Spring onion - 1 cup, chopped
  5. Jalapenos - 2 , sliced diagonally
  6. Paneer cubes - 1.5 cup
  7. Mushroom soy sauce - 1/2 cup or more as needed

Directions:
  1. Heat oil in a wok and when really hot, add the ginger and garlic. Let it cook for a couple of mins.
  2. Add the spring onions and paneer and stir fry until the paneer browns lightly and starts turning crisp.
  3. Add the jalapenos and cook for a couple of mins. Add the mushroom soy sauce and cook for 2 mins.
  4. Add more soy sauce if you want a little sauce in the dish. Garnish with some sprint onion and enjoy hot.

Tuesday, June 21, 2011

Dum Aloo

My visit to the farmer's market led me to buy a bag of multi colored mini potatoes. I was contemplating various options of consuming them and ended up with Dum Aloo for dinner one fine day. Here is the recipe -

Ingredients:
  1. Baby potatoes - 10, boiled until the alu is slightly cooked
  2. Yellow onions - 2, finely chopped
  3. Ginger paste - 1 tsp
  4. Garlic paste - 1 tsp
  5. Turmeric - 1/2 tsp
  6. Poppy seeds - 1 tsp
  7. Grated coconut - 2 tbsps
  8. Jeera - 1 tsp
  9. Dhania - 1 tsp
  10. Cardamom pods - 2 or 3
  11. Cloves - 3
  12. Cinnamon - 1 inch piece
  13. Dried red chillies - 3
  14. Garam masala - 1/4 tsp
  15. Salt
  16. Corriander - 1 cup, freshly chopped
  17. Kasuri methi - 1/2 tsp
  18. Yogurt - 1/2 cup
  19. Tomato - 1 big, blanched and pureed
Directions:
  1. Roast the poppy seeds, jeera, dhania, red chillies, cinnamon, cloves and cardamom separately and grind together with the ginger, garlic, turmeric, grated coconut and salt to make a fine paste.
  2. Heat oil and saute onions in it till golden brown.
  3. Add the paste and the tomato puree and cook till you see a uniform consistency and some oil separated on the sides.
  4. Add the yogurt and mix into the gravy.
  5. Add the potatoes and kasuri methi and a enough water to cover the potatoes.
  6. Place a lid and steam till the gravy and potatoes are fully cooked.
  7. Garnish with fresh chopped coriander.


Friday, April 22, 2011

Crispy Onion Pakoda


I never really thought about blogging this recipe until last week. As I was making this with my sister in her kitchen and walking her through it, I realized that not everything involved in it is intuitive and simple and its worth a blog post. This recipe evolved over the last 3 years and prior to that I used to make simple soggy onion pakoda. Some of it was inspired by this post by Asha of Foodie's hope and others are techniques I learned over time.

Ingredients:
  1. Red onion - 2 large onion, thinly sliced
  2. Besan - 1 cup
  3. Rice flour - 1 cup
  4. Corriander seeds - 1/2 cup
  5. Curry leaves - 10, finely chopped
  6. Corriander - 1/2 cup finely chopped
  7. Salt
  8. Red chilli powder - 1 tsp
  9. Fresh ginger paste - 1 tsp
  10. Fresh garlic paste - 1 tsp
  11. Oil for frying
  12. Chat masala
Directions:

Mix all the ingredients above without any water. Add more besan or rice flour if needed. The end result should be onions that are mildly moist and coated slightly with the flours. You should see more onions than flour.Do not add water unless the mixture is too dry. Take 1 tsp of the heated oil and add it to the mixture. This and the less water help make the pakodas very crispy. Heat oil in the pan and use two forks to drop the onions and separate them in the pan. Try not to drop lumps but each onion piece separately. This makes a huge difference. Fry until golden brown and sprinkle with chat masala as soon as the pakoda is out of the oil and serve hot with tomato ketchup.

Vegetable Kurma


I wanted to recreate the vegetable kurma they serve in south indian restaurants with puri or parotta forever! I finally got to it last weekend after scouting the internet for recipes and here is the outcome. Some recipes called for cauliflower also but I stuck to the usual suspects of potato, carrot, beans and peas since that is all I had in my fridge. This is a great dish if you want to get rid of your aging staples.

Ingredients:
  1. Khus khus - 2 tsps
  2. Jeera - 2 tsps
  3. Green cardamom - 2
  4. Cloves - 3
  5. Cinnamon stick - 1 inch piece
  6. Ginger - 1/2 inch pieces
  7. Garlic cloves - 4
  8. Green chillies - 2
  9. Coconut - fresh or frozen, 1/2 cup
  10. Cashews - 10
  11. Oil
  12. Bay leaf - 1
  13. Salt
  14. Onion - 1 big, chopped finely
  15. Carrots - 1.5 cups, cubed
  16. Potato - 1 cup, cubed
  17. Beans - 1 cup, chopped
  18. Peas - 1 cup
  19. Milk - 1 cup or cream 1/4 th cup
Directions:
  1. Roast ingredients 1 through 5 and grind together with ingredients from 6 to 10 to make a fine paste.
  2. Heat oil in a pan and add the bay leaf to it.
  3. Once you smell the aroma of the bay leaf, add the onion and saute till golden brown.
  4. Add the paste and saute till the rawness in the spices is gone.
  5. Add the potato, peas, carrot, beans, salt and enough water to cover all the veggies and cook on medium heat until the water reduces to form a gravy and the veggies are thoroughly cooked.
  6. Add the milk or cream and cook some more.
  7. Serve hot with puri or parotta. This kurma tastes better as it ages.

Wednesday, April 13, 2011

Pulikachal Recipe and Neer More, Panagam, Kheer, Payasam and Beans Curry for Sri Rama Navami


Yesterday was Ram Navami and I made the usual fare of panagam and neer more. I have posted the recipes for these previously here. I also changed it up by making semiya payasam (kheer), puliyogare with homemade pulikachal and beans curry.

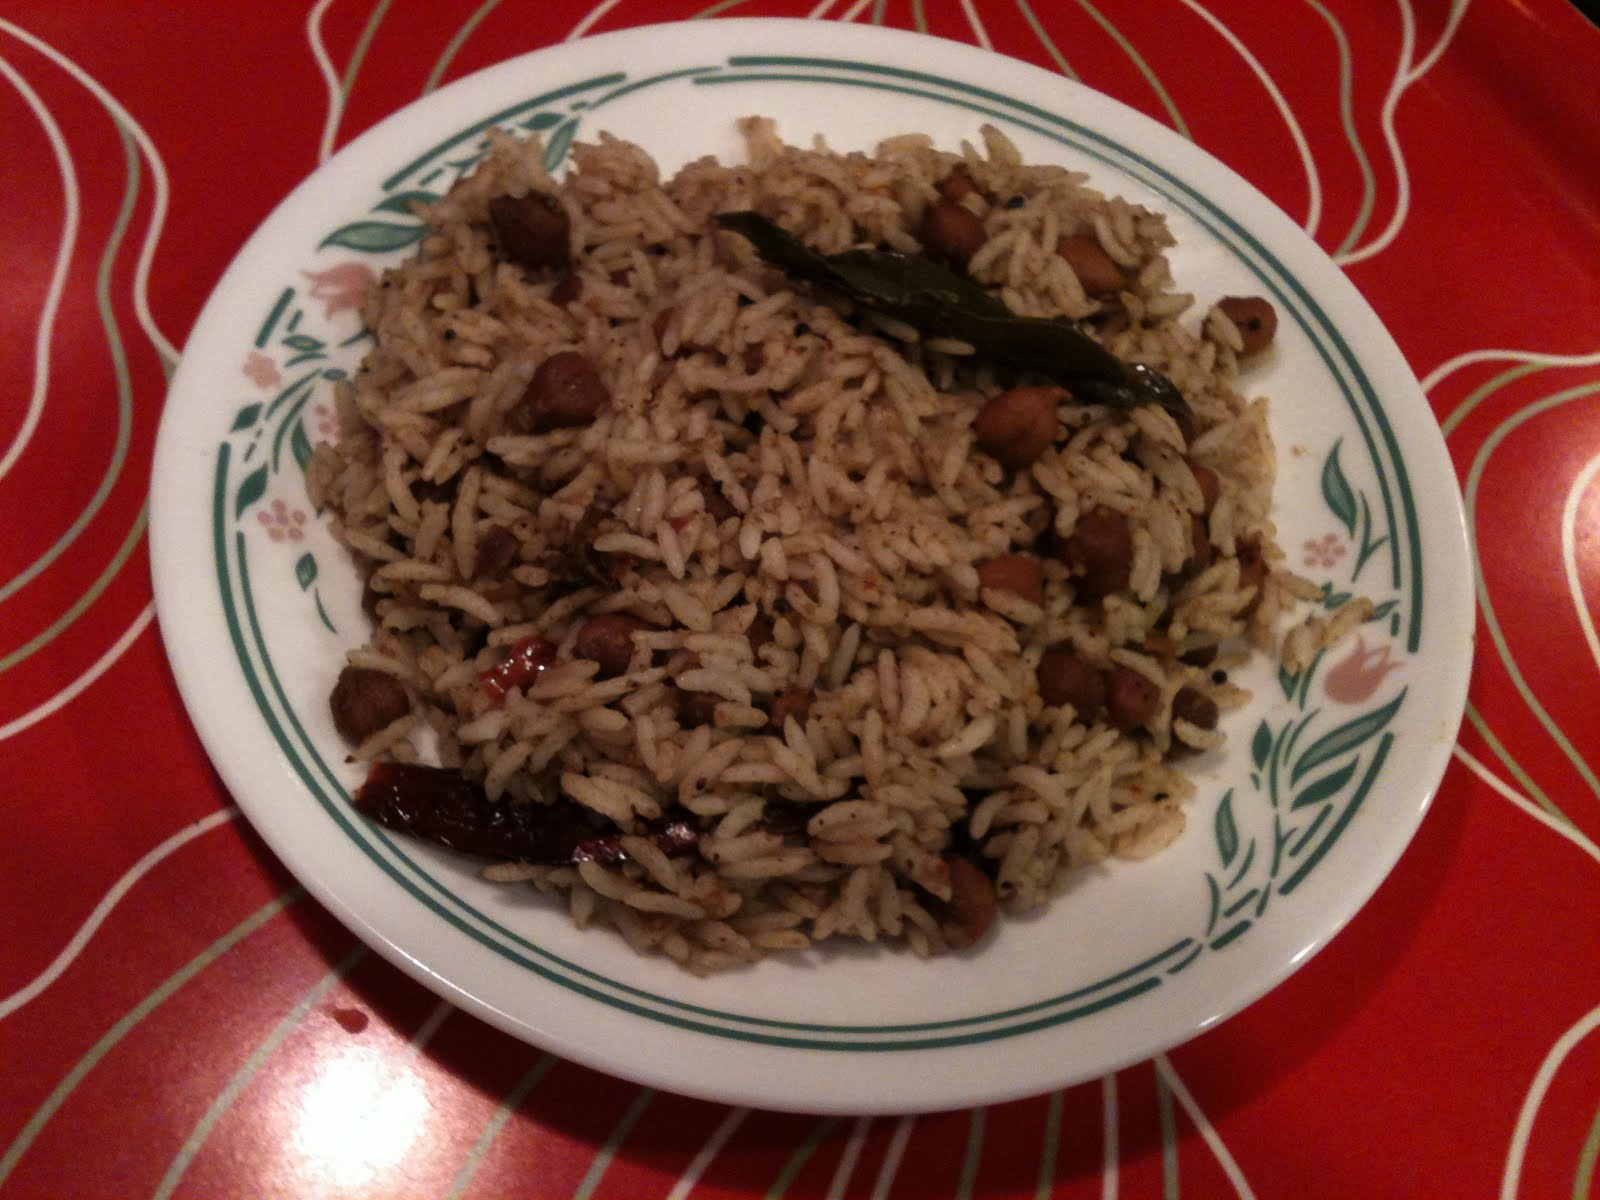
Tamarind rice is a very interesting dish to me and I have spent extensive time researching the nuances in the different versions. My love for it started from the tamarind rice given as prasadam in the temples in Hyd and during Ganesh Chaturti. It took me many years to replicate this version in my kitchen. It is called Pulihora in Andhra. This version is based purely on the flavor of tamarind and its sourness with some auxiliary things like chana dal giving added flavor. This tastes best a few hours after it has been made because rice then has enough time to soak in the tamarind's sourness. Puliyogare which is probably the kannada version uses some added spices which give it a darker color and enhances the flavor even more. I have not yet made this on my own. I use MTR's Puliyogare powder or paste and it turns our fine. This is a quick fix for a busy weekday night or when you have leftover rice. Pulikachal, which is the tamilian version, is mixed into rice to make Puli Chadam. What you see in the picture above is this. Pulikachal ends up being a thick tamarind pulp, reduces over a medium flame, with a spice powder added to it. My MIL's version also has kabuli chana which I usually add but for a change I added black chana. This definitely ups the protein content of the dish and give you something interesting to chew besides rice in this dish:). To help make the cooking process quick, I usually make the spice powder in bulk and freeze.

Pulihora Recipe: The beauty of this recipe is in its simplicity. You can add soaked and boiled black chana to this as well. Add anything more and you lose the authentic taste. I reached this conclusion after many trial and error recipes.

Ingredients:
  1. Rice - 2 cups
  2. Tamarind pulp - 1-1.5 cup (depends on how sour your tamarind is)
  3. Oil - 1 tbsp
  4. Green chillies - 3 or 4
  5. Dried red chillies - 4 or 5
  6. Urad dal - 1 tsp
  7. Chana dal - 2 tsp
  8. Groundnuts - 1 cup
  9. Turmeric - 1/2 tsp
  10. Salt
  11. Mustard seeds - 1 tsp
  12. Curry leaves - 8
Directions:
  1. Heat oil in a pan and add mustard seeds and turmeric to it.
  2. Once the mustard seeds have sputtered, add urad dal, chana dal, peanuts, green chillies, red chillies, curry leaves and roast these until urad dal and chana dal is golden brown. You may want to roast the peanuts separately and then add as they take longer.
  3. Add the rice, tamarind pulp and salt and mix well.
  4. Taste to check the sourness and add more tamarind pulp if needed.
  5. Place a lid and let the rice steam so that the rawness of tamarind goes away.

Puliyogare Recipe: I dont really have an authentic recipe for this one. My friend promised me one and hasn't given it to me yet (you know who you are :) ). I promise to blog once I have it. I use the MTR puliyogare powder. I make tadka with mustard, peanuts, red chillies and add the mix followed by rice.

Pulikachal Recipe: This recipe is split into 3 parts - recipe for the spice powder, recipe for the pulikachal and directions to make puli chadam.

Pulikachal spice powder recipe: This is an adaptation from my MIL's recipe with some changes.

Ingredients:
  1. Gingelly oil - 1 tsp
  2. Chana dal - 1 tbsp
  3. Mustard seeds - 1/2 tsp
  4. Jeera - 1 tsp
  5. Black sesame seeds - 1 tbsp
  6. Urad dal - 1 tbsp
  7. Methi seeds - 1/2 tsp
  8. Black pepper - 1 tbsp
  9. Red chillies - 5/6
  10. Coconut - grated, 1 cup
  11. Curry leaves - 5/6
Directions: Roast all the above ingredients individually in the oil and grind together to form a powder. The coconut should be roasted until it is golden brown. This can be made in bulk using cups for measurement instead of tsps as long as you keep the proportions.

Pulikachal Recipe: Pulikachal can used as a pickle or as a quick mix with rice to make puli chadam. It can be stored in an airtight jar in the fridge for a couple of weeks.

Ingredients:
  1. Tamarind pulp - 3 cups
  2. Water - 3 cups
  3. Gingelly oil - 1 tbsp
  4. Mustard seeds - 1 tsp
  5. Urad dal 1 tsp
  6. Black chana dal soaked and boiled or kabuli chana soaked and boiled - 1.5 cups
  7. Red chillies - 4/5
  8. Curry leaves - 8/10
  9. Hing - 1/4 tsp
  10. Salt
  11. Turmeric powder - 1/2 tsp
  12. Pulikachal spice powder - 4/5 tbsps
Directions:
  1. Heat oil in a pan and add mustard seeds, turmeric and hing. Once they sputter, add urad dal and roast till golden brown.
  2. Add red chillies and curry leaves and roast till you can smell their aroma.
  3. Add the black chana or kabuli chana and roast well for about 15 mins.
  4. Add the tamarind pulp, water and salt and boil this mixture until it reduces and becomes a thick pulp. This usually takes 30-45mins.
  5. Add the spice powder and mix well. Pulikachal is ready.

Directions to make puli chadam: Take a few teaspoons of the pulikachal and add it to 2 cups of rice. Add some gingelly oil and jump into the bowl with your hands like a true tamilian and mix away:). Serve this with papad and you have reached tamilian heaven:)


Tuesday, April 05, 2011

Shrikhand-Puri, Amti, Dhodkya Chi Bhaji, Varan Bhat, Koshimbir, Chitranna, Batatyachi Bhajji for Gudi Padwa


I made a lot of dishes for this Gudi Padwa but the star of the day was Shrikhand which is the ambrosia of Maharashtrians. Its a creamy dessert made from yogurt and flavored with cardamom and saffron. If you want to make a fat free light version of this, I'll tell you right away that it is simply not worth it. The delight of this dish lies in its creamy richness and you just cannot do away with using full fat yogurt. It is best enjoyed when you let it sit for at least half a day so that the flavors get absorbed and be sure to chill it before devouring it with hot puris. My dad is a connoisseur of Shrikhand and I got specific instructions( more like questions) from him when I was making this dish. His expression and happiness when he eats this dish always reminds me of a cat that eats the cream and purrs with pleasure and has cream dangling from its whiskers:D:D This post and dish is dedicated to my gourmand dad from whom I inherited my enthusiasm for food and thereby honed my talent in the kitchen.

In the picture above from left to right, starting with puri I have Puri, Shrikahnd, Amti, Dhodkya Chi Bhaji, Varan-Bhat, Koshimbir, Chitranna, Batatyachi Bhajji. Here are some of the recipes that I haven't blogged before -


Shrikhand

Ingredients:
  1. Full fat yogurt - 8-10 cups
  2. Sugar - I used about 1 cup but it could vary based on how sweet you like it. I suggest adding 1 spoon at a time and doing a taste test until it feels just right.
  3. Green cardamom - 8/10 pods, peeled and powdered
  4. Saffrom - 2 pinches
Directions:
  1. Drain the water from the yogurt by tying it in a thin cloth or cheese cloth and hanging it a little above the ground so that gravity can aid with this. I usually hang it on my tap and suspend it in my sink. You may have to do this overnight for the liquid to be completely drained out.
  2. What you are left with is a thick creamy residue. If you feel that this is grainy, you can send it through a sieve but I find that for the yogurt in USA you don't need to do this.
  3. Add sugar, cardamom powder and saffron and mix really well into this yogurt.
  4. Do this a day before serving for better results. It always tastes yummier the next day. Thats pretty much it. You can add some dried fruits to this if you like but it tastes heavenly as is.
  5. Another variation of this called 'Amrakhand' is made by adding mango pulp to the shrikhand. You can make it the same way as above with lesser sugar since you have the mango pulp for sweetness.

Koshimbir: The name of this dish applies to all raita-like dishes made with tomato, cucumber, carrot, onion or a combination of them and even guava. What distinguishes the maharashtrian way of making this is the distinct flavor of peanut powder in it.

Ingredients
  1. Tomatoes - 2, chopped
  2. Yogurt - 2 cups, beaten
  3. Roasted peanut powder - 3 tsp
  4. Oil - 1 tsp
  5. Jeera - 1/2 tsp
  6. Mustard seeds - 1/2 tsp
  7. Hing - 1/4th tsp
  8. Green chillies - 2 chopped fine
  9. Curry leaves - 4/5
  10. Salt
  11. Sugar - 1/4 tsp
Directions
  1. Mix the tomatoes, rogurt, salt, sugar and peanut powder together.
  2. Heat oil and add the mustard, jeera, hing, green chillies and curry leaves to it.
  3. Once the mustard seeds sputter, add it to the tomato mixture and mix well.
  4. The same can be done with cucumbers and grated carrot instead of tomatoes.

Dodkya Chi Bhaji (Ridge Gourd):

Ingredients
  1. Ridge gourd - 2, chopped into 1 inch pieces
  2. Chana dal - 1 cup, soaked for 1 hour
  3. Oil - 1 tsp
  4. Mustard seeds - 1/2 tsp
  5. Jeera - 1/2 tsp
  6. Hing - 1 pinch
  7. Turmeric - 1/4 tsp
  8. Salt
  9. Chilli powder - 1/2 tsp
  10. Kala masala (maharashtrian masala)
  11. Water - 2-3 cups
  12. Jaggery - 1/2 inc piece
  13. Fresh corriander - 1 cup, fnely chopped
Directions
  1. Heat oil and add jeera, mustard, hing and turmeric powder
  2. Add the dal and cut ridge gourd pieces, salt, kala masala, red chilli powder, jaggery and water and once mixed, place a lid on the pan and let it all steam until the water reduces a little and the veggies are cooked.
  3. Garnish with fresh corriander.

Friday, March 25, 2011

Goat Cheese and Roasted Bell Pepper Panini on Sourdough Bread


I am in love with Trader Joe's 99% fat free whole wheat sourdough bread. Its been a staple in my kitchen for the last month. It tastes yummy and toasts really well. It makes an interesting base for sandwiches and tastes even better for breakfast with butter and orange marmalade. I whipped up this quick sandwich on a weekday when I had all the ingredients at hand and felt like eating a panini. It was a very tasty and quick dinner.

Ingredients:
  1. Sourdough bread slices
  2. Goat cheese
  3. Pesto
  4. Roasted bell peppers (I get a jar of this from Trader Joe's)
  5. Sun dried tomatoes
  6. Fresh basil leaves
  7. Freshly ground pepper powder
  8. Olive oil
  9. Salt
Directions:
  1. Take two slices of sourdough bread. Layer one with the goat cheese and other with the pesto.
  2. Layer the sun dried tomatoes, roasted bell pepper and basil leaves.
  3. Sprinkle salt and pepper as needed and sandwich the two slices of bread.
  4. Brush on both external sides with olive oil and grill in a panini press.
  5. Cut the sandwich into two halves if it is too big and enjoy with soup or a salad.

Wednesday, March 23, 2011

Leftovers Heaven - Fodni Chi Chappati and Fodni Cha Bhat


Leftovers are ingredients for a whole range of yummy dishes and some so good that you deliberately keep food aside to enjoy them in a new form the next day. Two of my favorite leftover dishes are fodni chi chappati (translated as tadka chappati) and fodni cha bhat (translated as fodni cha bhat). As a kid, I would avidly wait for there to be leftover chappati and rice so that mom could make these dishes the next day. I was always advised not to eat them as fresh food is more nutritious and that made these dishes all the more inviting:D. My eagerness to eat these made me try them with fresh ingredients instead of leftovers the next day and trust me they do taste better with leftovers. I was watching a Khana Khazaana episode dedicated to reusing leftovers and there were some lovely recipes like spinach rice, rice fritters which I am definitely going to try the next time if I can have enough of these two:). I have also made curd rice with tadka, pulihora and tamarind rice with leftovers before and they taste good too. Chappati is really a luxury for me today. I make it sometimes but most times I bring it from outside. So to save it for this dish is hard sometimes and I don't get to make it as often. I now really admire the effort my mom took to fresh food especially the chappatis on the dinner table and that too with 3 kids. Whew! These women of the older generations really were super women. On that thought, here are the recipes -

Fodni Chi Chappati:

Ingredients:
  1. 4 or 5 stale chappatis - cut into small 1/2 inch size pieces, if possible do this by hand instead of a knife
  2. Yellow onion - 1 medium sized, finely chopped
  3. Curry leaves - 10
  4. Fresh corriander - 2 cupes finely chopped
  5. Lemon juice - 1 tbsp
  6. Oil - 1 tsp
  7. Turmeric - 1 pinch
  8. Green chillies - 1 finely chopped
  9. Red chilli powder - 1 tsp
  10. Mustard seeds - 1 tsp
  11. Jeera - 1 tsp
  12. Salt
Directions:
  1. Heat oil and add mustard, jeera and turmeric.
  2. Once the mustard seed sputter, add the green chillies and curry leaves.
  3. After a min, add the onion and saute till well done
  4. Add the chappati, chilli powder and salt and cook till well done and the chappati start becoming a little crisp.
  5. Add the coriander and lemon juice and mix well. Take the pan off the gas.


Fodni Cha Bhaat:

Ingredients:
  1. 2 cups leftover rice
  2. Oil - 1 tsp
  3. Mustard - 1 tsp
  4. Jeera - 1 tsp
  5. Turmeric - 1/2 tsp
  6. Hing - 1/4 tsp
  7. Onion - 1 medium, chopped
  8. Green capsicum - 1, cubed
  9. Green chilli - 1 finely chopped
  10. Red chilli powder - 1/2 tsp
  11. Corriander - 1 cup, chopped
  12. Lemon juice - 2 tsps
  13. Salt
Directions:
  1. Heat oil in the pan and add mustard, jeera, turmeric and hing.
  2. Once the mustard seed sputter, add the green chillies.
  3. After a min, add the onions until they are not totally cooked and slightly underdone.
  4. Add capsicum and saute for 2 mins.
  5. Add the rice, chilli powder and salt. Mix well and let the rice steam and get cooked thoroughly for a few mins.
  6. Add the corriander and lemon juice and the dish is ready.
Note: When cooking with stale food, it is always important to make sure the dish is heated and cooked well.

Tuesday, February 22, 2011

Roasted Butternut Squash


Feb is the month of anniversary and Valentine's day celebrations and gives me an excuse to cook special stuff. I have been planning to re-create this roasted butternut squash dish we had a while ago while on holiday in Maui at this restaurant called 'Penne Pasta' . It is half a butternut squash loaded with butter, sage and slivered almonds and oven roasted till it is soft and delicious. Mine turned out to be close to it except I could not get myself to add as much butter. This dish holds very romantic memories of the good time we had in Maui. Incidentally, if you look at the cavity in the squash, its a heart shape:)

Ingredients:
  1. Butternut squash - 1/2 sliced down the middle
  2. Butter - 1.5 tbsps
  3. Salt
  4. Fresh black pepper - 1/2 tsp
  5. Red chilli flakes - 1/2 tsp
  6. Fresh sage - 4/5 leaves, chopped into ribbons
  7. Slivered almonds - 1/2 cup
Directions:
  1. Smother the butternut squash with 1 tbsp melted butter, salt, pepper and stick it in the over at 350 F. I had to bake it for almost 45 mins to get it soft but the bake time might vary depending on the oven. Use a fork to check the done-ness frequently after 30 mins have elapsed.
  2. Toast the slivered almonds either in a pan or an oven until golden brown.
  3. Take 1/4 tbsp of butter and sautee the chopped sage leave for 5 mins.
  4. Top the bakes butternut squash with chilli flakes, toasted slivered almonds, sage leaves and the remaining butter while its still hot and enjoy.
Note: You may use parsley to flavor instead of sage if you are averse to its smell.


We re-did another dining experience by celebrating Valentine's day at Tigelleria which we discovered on our anniversary 2 years ago. We ordered a pear stuffed ravioli with walnut sauce, a cheese platter, a very pretentious salad and pesto fusili pasta. The dessert was pistaschio pannacotta which was served with a heart shaped spoon. A very satisfactory meal indeed!