This blog documents my journey in the kitchen from Pav Bhaji to Pesarettu, from Baked Ravioli to Fried Rice and from Cinnamon Sticks to Pizza. A special thanks to my generous mom who let me wander into her kitchen and bug her with questions that she couldn't possible answer with a straight face:). To good food and good life!!!
Wednesday, March 15, 2006
Puran
I made this yesterday for Holi. Traditionally puran poli is made but I didnt find the time for it. Maybe next time!
Ingredients:
1) 1 cup chana daal
2) 1 1/2 cup water
3) Elaichi powder (2-3 elaichies)
4) 1 cup sugar
5) 1/2 spoon ghee
Directions:
1) Pressure cook chana daal just a little and drain excess water
2) Added sugar to chana daal and cook on low heat till the mixture starts thickening
3) Add elaichi powder and stir it in and cook some more
4) Once in the serving plate, garnish with ghee and serve hot
Credits: Again, mom's recipe and her suggestion to make it for Holi. So thanx to her for that and all the other times she has made puran and puran poli and "kata chi amti" from the excess water that comes out of cooking the chana daal. :)
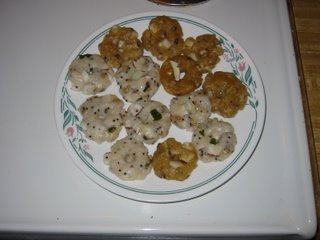
Karadaiyan Nombu Adai
This is a dish made on the ocassion of "Karadai Nombu" which is an important festival for the tamilians. Its the day a woman prays for the well being and long life of her husband in remembrance of the Satyavan-Savithri katha. Both sweet and salt adai are made on the ocassion and the recipes for these are below.
Sweet Nombu Adai
Ingredients:
1) 1 cup rice flour
2) 1 1/2 cup water
3) Elaichi powder (2-3 elaichis)
4) 1/2 cup finely chopped fresh coconut
5) 1 cup jaggery
6) 2-3 spoons boiled black eyed beans (Also known as chavali, lobiya or karamani)
Directions:
1) Roast rice flour for 5-10 min. Do not let it change color.
2) Bring the water to a boil in a pan and add the jaggery
3) Once the jaggery melts filter the water to remove sediments and place it on heat again.
4) Add elaichi powder and let the liquid come to a boil
5) Add the boiled beans and coconut
6) Turn the heat down and slowly add the roasted rice flour and mix it into the liquid as smoothly as possible without letting it form any lumps and take it off the heat once you have gathered the whole mixture together. The mixture should be of the consistency of chappati dough probably a little harder.
7) Once the dough cools down, make them into the shape of medu vadas. Grease idli plates with ghee or oil and steam for 5-10mins.
8) Serve hot with unsalted butter.
Salty Nombu Adai
Ingredients:
1) 1 cup rice flour
2) 1 1/2 cup water
3) Green chillies finely chopped (1-2)
4) 1/2 cup finely chopped fresh coconut
5) Curry leaves finely chopped (4-5)
6) 2-3 spoons boiled black eyed beans (Also known as chavali, lobiya or karamani)
7) Asafoetida (hing)
8) Salt
9) 1 tbs oil
10) Mustard seeds (1 tsp)
Directions:
1) Roast rice flour for 5-10 min. Do not let it change color.
2) In a pan heat the oil and add mustard seeds. When they have burst open, add chillies and curry leaves and fry them for 1 min. Then add the water and let it boil.
3) Add the hing and salt to the boiling water
4) Add the boiled beans and coconut
6) Turn the heat down and slowly add the roasted rice flour and mix it into the liquid as smoothly as possible without letting it form any lumps and take it off the heat once you have gathered the whole mixture together. The mixture should be of the consistency of chappati dough probably a little harder.
7) Once the dough cools down, make them into the shape of medu vadas. Grease idli plates with ghee or oil and steam for 5-10mins.
8) Serve hot with unsalted butter.
Credits: These recipes are suggested by my sister-in-law Bhargavi and my mother-in-law and their kind guidance encouraged me to try them out yesterday. Turns out that they came out quite well. So a big thank you to both for them for the recipes and for the encouragement.
Monday, March 06, 2006
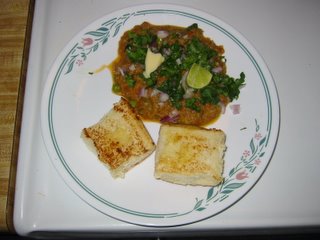
Pav Bhaji (Serves 5-6)
Ingredients
1) 4 Onions (Medium sized)
2) 5 tomatoes (Medium sized)
3) 1/2 Cauliflower
4) 1/2 Cabbage
5) 15-20 French beans
6) 4-5 Carrots
7) 6 Potatoes (Medium sized)
8) Peas
9) Ginger (1 inch)
10) 4-5 big cloves or 7-8 small ones
11) Salt to taste
12) Chilly powder 1/2 spoon
13) Pav bhaji masala (I use Everest because mom used it, but any one is fine)
14) Oil (4-5 table spoons or less)
15) Cilantro (Corriander leaves)
16) Small slices of Lime
17) Butter (Amul or any)
Note about ingredients: You could skip the fresh ginger and garlic and use a premade ginger garlic paste. I prefer making it fresh because it tastes better.
Directions:
1) Cut and boil the vegetables(Cauliflower, cabbage, carrot, beans). Boil the potatoes and peel them. Mash all the boiled vegetables and the potatoes as well as you can and keep them aside. Do no throw away the water from the vegetables as you can use it later.
2) Chop the onions and tomatoes as finaly as possible. In a pan heat and saute the onions till they are deep goldeb brown.
3) Add ginger garlic paste to the onion and saute for 2-3 mins.
4) Add chopped tomatoes to the pan and saute them till the tomatoes are well done and get maches easily.
5) Now you could either use a pav bhaji masher and make this mixture smoother or you could cool it and run it in the blender to make a smoother paste. I do the latter as then you dont feel the onion when you eat the pav bhaji.
6) If you have used the blender, pour the mixture back onto the pan and now, add red chilly powder and about 3 spoons on pav bhaji masala and stir and saute till you feel the flavour of the masala ebbing out.
7) Now pour in the other mashed vegetables and peas and add salt and stir the whole mixture together.
8) Let it heat for 10-15 mins. Add the vegetable broth if you feel that the consistency is too think.
Garnishing: Your pav bhaji is ready but before you eat it don't forget to garnish it with chopped Cilantro, a slice of lime, maybe chopped onion and most important of all, a dollop of Amul butter!!!! And of course, dont forget the toasted and buttered pav.....enjoy!
Note: You maye change the quantity of the masala if you feel it is a little bland...
Credits: This is my mom's recipe and I learnt it while assisting her whenever she made it. So mamma, thank you:)
Thursday, March 02, 2006
Gobi Manchurian (Funchurian)
I renamed this dish "Funchurian" because my hubby and I had a lot of fun making it:). For those struggling to get the right consistency for the batter, here are some tips
1) If you are using corn starch (not corn flour) mix some besan into it and it will get a better consistency.
2) You can add some chilli powder to the batter to make it look closer tot he kind we are used to.
3) Nothing beats corn flour or starch for this dish, but if you don't have either, try mixingup maida and besan for the batter. Let me know if this works ok.
Sweety, this is for you!
Ingredients:
1) Cauliflower
2) Corn Flour (enough to make batter for the cauliflower)
3) Green chillies
4) Ginger (2 inches long)
5) Garlic (6-7 big cloves or 10-12 small ones)
6) Chopped spring onion
7) Soy Sauce
8) Oil to fry
9) 1 cup water for the gravy
Directions:
1) Make a batter with the corn flour and water. Cut the cauliflower into 1-2 inch pices and dip it int he batter and deep fry. Keep the fried cauliflower on a tissue so that it absorbs excess oil.
2) In a pan heat 2 tsps oil and add chopped ginger, garlic and green chillies and saute for a min or two.
3) Add the water to the sauteed mixture and let it come to a boil. Add enough soy sauce so that the mixture is a deep brown. No gently pour in 2-3 spoons of the left over corn flour batter and keep stirring. Once this mixture comes to a boil and the corn flour batter is mixed it, the consistensy will start thickening.
4) Add the fried machurian to the gravy and take it off the heat. Garnish with some chopped spring onion and serve hot with fried rice!
Note: My motivation to learn this dish was to get my mom to try manchurian. She shied away from it because it resembled non-vegeterian dishes and the only way I could convince her to eat it was to make it at home. She loved it and now never hesitates to eat it even when we eat out. :) . Unfortunately this time when I made it, my hubby and I gobled it up before I could take a pic. So maybe next time!
Wednesday, March 01, 2006
Tips
1) DO NOT substitute corn flour with "atta".....This will just nto work well....A reasonable alternative would be maida or besan in *some* cases but NOT atta....This tip is meant specially for "you-know-who"....:D:D
A note from the author
As most of you know, I live to eat and not vice versa. In order to share my passion with everyone, I have started this blog of my recipes with my friends and family. I assume that whoever uses these will have some basic background in cooking so that I do not have to quantify some of the ingredients like salt/pepper/red chilly powder, etc. I will add tips at the end of recipes if I have any and also add them to a common post titled "Tips". I give all the credit for my cooking skills to my mom who let me venture into the kitchen (to "help" her) when I was a kid and disrupt her organized activities ;) ;) ;). Mom, Dad, Sweety and Rashmi , I thank you for letting me experiment on you. In the more recent times I thank Shiru (my husband) who equals my enthusiasm for food and keeps the desire in me awake to try out new recipes. I would also like to give credit as appropriate whenver possible. So,if I do fail to acknowledge someone, I apologize and request you to bring it to my notice so that I can give them their due credit.
-Dabbu
03/20/06: I have been remiss in not giving due credit to my hubby Sriram for taking all the pictures for the blog. So a big thank you to him for all the help! :)
-Dabbu
03/20/06: I have been remiss in not giving due credit to my hubby Sriram for taking all the pictures for the blog. So a big thank you to him for all the help! :)